


There are thousands of adults and children who are required to perform clean intermittent catheterization (CIC) as part of their daily lives. Catheterizations have to be performed secondary to a wide array of medical conditions. Conditions such as these may be caused by problems with neurogenic (neurological origin) or myogenic (muscular origin) bladders. Neurogenic and myogenic bladders do not have the capability to squeeze out urine or empty it to completion. Therefore, the bladder must be emptied manually with the insertion of a catheter.
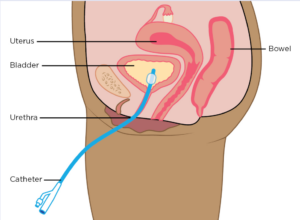
Female:
Male:
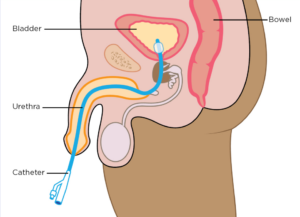
The process of catheterization comes with several potential problems that may be harmful to the body. Normally the urinary system is a bacteria-free, “sterile environment”. Introducing a catheter through the native urethra or catheterizable stoma allows bacteria from the outside world to enter the bladder. As a result, colonization of the bladder occurs. Colonization means these germs are introduced into your body, but they do not make you sick. The bacteria need heat/warmth, moisture, and darkness to multiply and survive. This physiological process of adaptation to these different bacteria living inside the bladder takes place over time, and if properly managed colonization is not a problem. Catheterization times may need to be scheduled closer together, every 3 hours, to avoid heavy colonization as extended time (4-6 hours/overnight) results in more bacterial growth.
However, individuals who have to perform CIC do place themselves at risk of developing “symptomatic” urinary tract infections.
Symptoms of UTIs usually present as:
- Strong, or foul-smelling urine
- Thick or cloudy urine
- Painful catheterization
- Bladder pain
- Back or flank pain
- Hematuria (blood in the urine)
- Lethargy
- Nausea
- Vomiting
- Fever **hallmark sign**
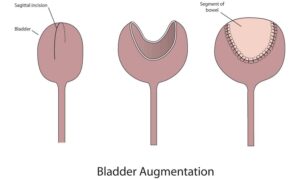
Augmented Bladders
Another population of people catheterizes “augmented” bladders. Augmented bladders are bladders that have been surgically enlarged. The most common type of bladder augmentation uses a segment of the small intestine – ileum (illeocystoplasty). Other types of augmentations of the bladder are the large intestine (sigmoid cystoplasty), the stomach (gastro cystoplasty), or salvaged ureteral tissue from complex megaureter cases (ureterocystoplasty).
A common problem with bladder augmentations when using bowel tissue is the build-up of mucous in the bladder that is normally produced by the bowel segment. This collection of mucous and sediment must be removed from the bladder in order to avoid complications with UTIs, stone formation, or urinary incontinence. This is secondary to mucous plugs that have the ability to cause disruption of the bladder neck or continent stoma valve mechanism.
Bladder Irrigation in Augmented Bladders:
Bladder irrigation in the gastro cystoplasty population helps to keep everything healthy and clean. This simple process can help rid the bladder of unwanted sediment, mucous, bacteria, tiny calculi, blood clots, and the constantly shedding epithelial cell debris from the lining of the bladder. The gastro cystoplasty population may also use an antacid solution for irrigation, such as Maalox, which can help decrease problems with painful “hematuria dysuria syndrome” caused by caustic gastric acid secretions.
Bladder Irrigation in Non-Augmented Bladders:
Regular bladder irrigations in the non-augmented population can help decrease complications from unwanted bacterial colonization resulting in symptomatic UTIs. It also helps to remove “old-stale” urine from the various folds and pockets of the bladder lining. Irrigation using an antibiotic solution, such as Gentamicin mixed with normal saline, can also be quite helpful in treating lingering cystitis and recurrent UTIs.
Cons of Bladder Irrigation:
Bladder irrigation can be time-consuming to some individuals and is perceived as extra maintenance in addition to regular CIC. Other disadvantages include certain manual dexterity issues when the person needs assistance to complete the irrigation process effectively. This can easily be rectified with good technique, efficiency, and planning with the individual’s catheterization schedule. For example, perform irrigation when it is more convenient, such as first thing in the morning when you cath, right before bedtime, or before bathing. Do it in the comfort of your home or in a familiar environment, where all the needed supplies are at your disposal. Bladder irrigations aren’t really necessary in the school setting.
A large group of the bladder exstrophy population generally does not like to irrigate or catheterize for that matter, because of their increased hypersensitivity of the bladder neck area. The flow of irrigation fluid or even the catheter gently touching this area can often cause severe discomfort resulting in ineffective irrigation and poor emptying over the long term. This bladder neck hypersensitivity can improve over time if bladder irrigations are done consistently to promote desensitization from constant exposure to the process. Additionally, the bladder irrigation technique can be modified so that the tip of the catheter is not positioned directly on top of the bladder neck by pulling the catheter back away from this area. Also using the “gentle” irrigation technique may be more comfortable for Exstrophy patients than the “piston-pump” technique, but it’s not as effective.
How to Irrigate the Bladder:
The supplies needed for bladder irrigation are as follows:
- Sterile normal saline or sterile water. The bladder is not a sterile environment any longer once CIC is started, therefore we have many patients irrigating with over-the-counter distilled water.
- A two-ounce, 60cc, catheter tip syringe
- Sterile lubricants, such as K-Y Jelly unless your catheter is pre-lubricated or hydrophilic.
- A catheter (preferably a long, sixteen-inch, male-type catheter with an adapting syringe hub) to provide an attachment for the syringe and provide more length and manipulation of the syringe. Females can still irrigate using a short female catheter with an appropriate catheter hub- however, the working space may be more confined.
- An inexpensive stainless steel collection basin, such as a new dog bowl, can be used to pour the irrigation fluid into. Stainless Steel resists bacterial growth and is easy to wipe out with alcohol or wash with soap and water.
- Use another basin, a large plastic cup, or use the toilet to dispose of the irrigated waste
Good technique is very important to perform appropriate bladder irrigation. I prefer to teach all my patients how to perform both “gentle” and “aggressive” irrigations.
- -Gentle irrigation is simply done by instilling the fluid at a slower, steady rate and aspirating back the fluid slowly and gently. Perform irrigation until clear fluid returns.
- -Aggressive irrigation also involves instilling the fluid at a slightly faster, but steady rate.
Steps for Bladder Irrigation:
- Drain/Empty the bladder completely.
- Depending on the size of the bladder and patient, draw up 30mL of irrigation fluid for infants, and 60mL for older kids, teens, and adults. Augmented bladders may need 90-120mL, but 60 generally always works the best.
- Once the fluid is instilled into the bladder, first pull back on the syringe to assure that the catheter eyelets are not clogged or obscured by bladder tissue. The plunger should pull back nicely without any resistance. If it is stuck, or won’t pull back, simply release the plunger and reposition the catheter tip so it hovers in the center of the bladder. Not too far in against the bladder wall, and not too far back where urethral, or stomal tissue, obscures the eyelets. Find the “sweet spot” to position the catheter tip.
- Then begin to manipulate the syringe plunger back and forth in steady 5-10mL increments creating a “piston-pump type” motion. This allows the fluid to create a “washing machine” effect inside the bladder, thus aggressively stirring up all types of debris. If you leave a small 5mL window at the beginning of the syringe, you can watch the debris (floaties) circulate to see how effectively you are irrigating. No certain number of pumps is required, just irrigate until debris is adequately stirred up.
- Then slowly aspirate the infused irrigation and debris back into the syringe, taking care to not pull too hard at the end so you don’t pinch or catch bladder wall tissue in the eyelets as the bladder collapses down around the catheter tip.
- Repeat as many times as needed until clear fluid returns. You can not injure yourself or the bladder with irrigation. It’s healthy for the bladder environment!!
You can see how effective this technique is by the amount of debris that is stirred up and withdrawn from the bladder. If the plunger is pulled back and suddenly stops, it most likely has sucked the bladder wall up against the openings at the end of the catheter. Gently push some fluid back into the bladder, and reposition the catheter tip to resume irrigation. People with normal bladder sensations can feel this process happen and it may result in a sharp tinge of pain. There may be a spec of blood in the catheter too if this happens, but it is of no concern as the bladder will heal itself in minutes.
Bladder irrigation is very healthy for the regular maintenance of the many different types of bladder environments. This process is simple and quick to learn and does not require any extra medical supplies to perform. A regularly irrigated bladder is a happy bladder. Maintaining a healthy bladder environment with regular washouts can provide positive long-term urological health outcomes.
OKC Kids Urology has a plethora of resources for those who need to perform bladder irrigation. Check out our Youtube, https://www.youtube.com/@bladderexstrophyokckidsurology, where we present multiple videos on UTIs and Bladder Irrigation, alongside many other topics. At OKC Kids we are here to help you keep your bladder happy and healthy!!
Thanks, Jake Klein 

 1.405.678.9876